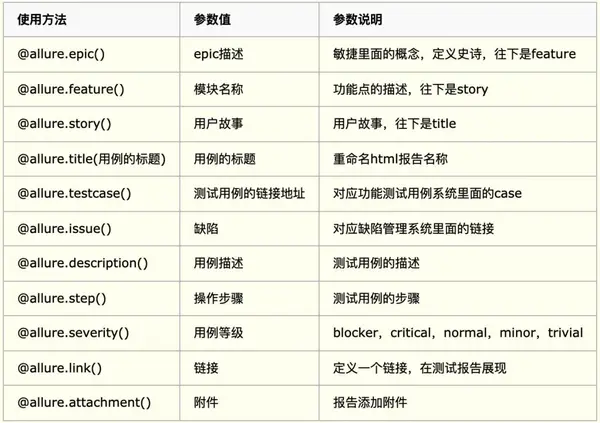
Re-Optimizing your content with the right On-Page SEO Strategy is one of the most challenging tasks, and you may ask how and why?
Whenever you are drafting a piece of content…
…you always have to make sure to add enough herbs and spices during preparation so that your content turns out to be the best recipe in the world.
In our case, the recipe is your blog article, and the seasoning for this delicious meal is your On-Page SEO.
…still confused and scratching your head?
On-Page SEO is one of the most important skills you need as a SEOer. Even if you are not a hardcore SEOer, you want to make sure your contents can be found by millions of people (the dream of every blog article.)
…but one of the hardest challenges is to ensure that Bots…Google Bots (Was trying to Reference to the dialogue Bond…James Bond 😅 ) can understand your content better.
But But But, hold your breath…
You thought optimizing your content is hard?
Let me tell you the truth…
If you expected the answer to be “Yes!”, then I agree with you.
One of the biggest challenges when working on your blog article is optimizing your content, aka doing On-Page SEO the right way…
…and in this article, if you read every single point, you can master the art of On-Page SEO.
I will also reveal how I growth hacked the organic traffic for one of my clients by 54% on a monthly basis using my Simple 17-Step On-Page SEO Checklist in combination with my SEO Copywriting Technique Guide.
The important On Page SEO Factors in 2017

Click Here to view the on page seo infographics in full size
..do like my page:
..and join my exclusive:
#1) Improve Your Site’s Loading Speed
…aka make your sites an online version of Superman (I know, another lame attempt to make you laugh)…
Do you love slow sites?
I bet your answer will be “NO…”
…and you will say, “I hate slow loading sites.”
In fact, if they don’t load in 3 seconds, you say, ”SCREW THIS SITE!”…I’m leaving…
(SCREW THIS SITE resembles the frustration)
Here is a fantastic article on the Fast Company that you can read: How One Second can cost Amazon $1.6 Billion in Sales
Page Speed became a ranking factor in April 2010 giving a highly high preference to speed to serve their users better.
Now:
Do you think it’s important for your site to load quickly?
Certainly not, because if you don’t like visiting slow loading websites…
…it’s certainly not fair for your sites to load slowly.
I’ll tell you a short real-life case study about my hosting company Power Up Hostingwebsite.
…and how a small change boosted my traffic drastically to increase my ranking and traffic by a JAW-breaking percentage.
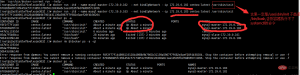
Every year we update our website to a newer layout and design (the one that you see right now, we are on v5.2).
v4.0 was one of the most horrible websites regarding loading, and after we released, I saw a massive drop in traffic, ranking, and sales.
In September 2016 our team decided to completely scrap WordPress and go with a custom design built on React and Ghost CMS.

Look at that massive jump in traffic during October 2016 when we pushed the new layout.
Note we not only growth hacked our traffic, but also our rankings:

These stats are real. I am pulling them hot and fresh from Ahrefs. Anyone who wants to cross-verify is more than welcome. 🙂
If you look at both of the above screenshot, you will notice one thing they have in common…
The graphs started rising from October in 2016.
This is clear evidence that your site’s loading speed is one of the major ranking factors.
Regardless, no one likes slow loading website, at least I don’t, and we realized that mistake after moving to v5.0 (currently updated to v5.2).
Here is my advice: If you want to use WordPress, then I will highly recommend you use StudioPress or MyThemeShop
If you want something better, then opt for React + Ghost CMS combination.
#2) Length of the Content aka Word-Count
For me, SEO is all about:
- High-quality content (…and more of it)
- Great design with a fast loading website
- Proper optimization of pages
- Off-page SEO
High quality is one of the major reasons why most of the top articles are ranking. According to the recent data analysis done by Ahrefs and Backlinko, it was found that the average word-count for an article is right around 1,900 words.
If you were planning to write less, then you need to rethink that game plan
…but do not just stuff topics or irrelevant keywords into the writing. In fact, you need comprehensive research around the subject and to create a great outline for your content before writing.
My 8,950-word article on SEO Copywriting will help you understand how to draft long form content without needing to worry about stuffing any keywords and content.
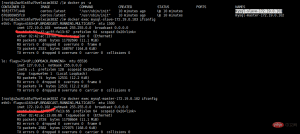
Here is one of my articles that I published two months (in June) ago on Page #2 without building any backlinks.

The article has already attracted a few linkreator (Link + Creators).
Not only that, it’s currently ranking at Position #15 at the time of writing this article. The ranking is only moving up every single day.
Let me break down some of the important aspects of that article and why it’s performing so well.
The loading speed is spot-on. The entire page loads in less than two seconds.
My entire site is built on lazy loading.
Which means, everything gets loaded except for images. As you keep scrolling down, the images will keep loading. This is essential for lengthy content because you will be referencing multiple images.
Also, ever since I switched to Google Tags to load all my scripts, I have seen a improvement in the loading speed by well over 30%.
Ghost has the lazy loading feature inbuilt into its core software.
However, for WordPress, you will have to rely on a 3rd plugin.
Highly Optimized On-Page SEO Techniques. (Make sure to read my entire guide thoroughly.)
I use this guide, and my personalized SEO Checklist, heavily for all my pages and blog post. Want my personalized SEO Checklist? Click here to download!</a
Ultra In-depth: One-Stop Guide.
This point is my favorite as I will share some of the further insights to help you understand why that article is performing so well even without building any backlinks.
The article is in-depth.
How in-depth?
Approximately 8,950 words to date. I’m always adding more data on a regular basis to keep the content updated and fresh.
Amazing Bounce Rate
An image speaks a thousand words

My article on Micro Niche Sites has an incredible bounce rate.
Incredible = 10.90% to date, which is huge!
When you write an in-depth guide, people tend to spend a lot longer on your website. In fact, they will come back, again and again, to re-read the same content over and over again.
That kind of bounce rate sends a signal to Google that your article is doing an incredible job by providing all the required information to its users.
If you are still not convinced, then oh well! You should start planning out your content strategy.
If you get this one right and start writing over 4,000-word, in-depth guides, then you will be ahead of most of your competitors.
#3) Make your site responsive if you still haven’t!
On 21st April, 2015, Google released a new Mobilegeddon & The Google Mobile Friendly Update.
With the increase in the number of mobile users, Google has made it an absolute compulsion that developers should have a mobile friendly website.
If you are still wondering whether your site is responsible or not, you can use Google’s Mobile Friendly Testing Platform.

If you see, “Page is Mobile-Friendly” then you are good to go!
Also, here is another amazing application from Google to check the loading speed of your mobile websites.
It’s known as Think With Google

In my case, I am using several Javascript tracking tools on my website, which is why Google is showing the result as 5s.
However, that doesn’t affect my ranking much because I am loading those scripts after my website is fully loaded with all the contents.
Also, I’m already Renderblocking my internal JS files.
In my case, everything is perfect! 🙂
Here is my advice: If you are on WordPress, avoid using as many plugins as possible. To improve the loading speed of your WordPress site, I highly recommend you to check out WP Rocket.
#4) Have Your Keyword in the Start of Your Meta Title.
I am sure you have heard this On-Page SEO factor constantly.
However, what you haven’t heard are Keywords that are in the Meta Title first tend to perform a lot more.
I experiment a lot with my titles, and I change them all the time to understand the impact and changes that the title creates.
From my experience, optimizing thousands of blog posts for myself and my clients, I recommend you start your meta title with your keyword.

Over 98% of my blog articles or pages, in the majority of my projects begin with my targeted keyword.
Result?
The above article is ranking at Page #1 for a very long time without me doing any link building.
Here is my advice: Apart from your targeted keyword, try to add extended targeted keywords.
Here is an example:
In one of my recent blog articles that show users how to do Keyword Research using my Keyword Technique, I started the Title of my page with my targeted keyword + an extended keyword.

In this case, instead of targeting Keyword Research in my meta title, I am targeting the keyword: Keyword Research for SEO which includes an extended keyword at the beginning.
This strategy is ideal because you are primarily targeting two keywords without making your title look spammy or like click bait.
Here is my advice: Apart from your targeted and extended keywords, try to add additional modifiers for better CTR, which has a huge impact on a better ranking.
#5) Have Your Keyword in the Meta Description.
Look:
Meta Descriptions after Meta Titles are the second most important On-Page SEO factors.
It’s so important that, if you don’t mention your targeted keyword in your meta description, the chances of you technically ranking #1 is close to impossible. (Unless you are planning to build a ton of backlinks.)
I use a little strategy when I write my meta description.
I call it my Magnetic Meta Description Technique that I covered in my SEO Copywriting guide.
Google shows a total of 170 characters.
However, it’s highly recommended that one should not exceed 145 characters. In the worst case, a maximum of 160 characters.
Unless you have a specified date mentioned that shows up in the SERP, then do not write a meta description exceeding 145 characters.

If you look at the screenshot above:
I have a specified date, and I am using an ellipsis in my description to stand out. Along with using the combination of Primary Keyword + Extended Keyword formula.

If you look at the above examples…
Many of the sites have not written their meta description correctly and within the character limit.
When that happens, you will see the … at the of the sentence which looks pretty awful.
#6) Short Keyword Focused URL
One of the biggest mistakes I made with most of my websites during my initial days was stuffing multiple keywords in the short URL.

Sadly, my structure and links are built on the same concept of stuffing multiple keywords in the URL.
However, lately, I have started re-auditing a lot of other web properties (I own over 2,500+ web properties.)
As a result, studies show that your first five words are the most crucial ones.
That means, do not extend your short URL over five words.
Here is an example of how I have started auditing and editing all my properties by implementing the short URLs.
Long Ugly URL: https: //poweruphosting .com/cheap-linux-vps-server-hosting-on-ssd
Short Beautiful URL: https: //poweruphosting .com/cheap-linux-vps
Ugly URL: https:// uditgoenka .com/?id=51
Beautiful URL: https: //uditgoenka .com/on-page-seo
Make sure that if you are re-working one of your old sites, you setup your 301 correctly. That will ensure a proper flow of link juice.
Should I use dates in my URL?
I have heard many debates on this.
Based on my experience, avoid using them.
You may ask why?
Because:
Your URL structure will become lengthy. If you want to add dates, use meta description instead of your URL.
Also, if you add a date to your URL, you will never be able to change it if you update your article in the future. (301ing your URL all the time can hurt your SEO efforts).
My ideal recommendation will be to use either of the following:
- Preferred Short URL Structure #1: https://uditgoenka.com/on-page-seo
- Preferred Short URL Structure #2: https://gopbn.com/blog/pbn-hosting
By adding the term blog/article, you are defining the type of article the reader can expect.
One highly controversial discussion is whether to add the category in the URL.
In an ideal scenario, I will avoid it. Unless I am keeping one structure in the slug.
For example:
I will go https:// example. com/blog that will list down all my articles. Followed by adding the categories in this format:
- https:// example. com/health/short-url
- https:// example. com/business/short-url
- https:// example. com/social-media/short-url
and so on…
The above setup will require some customization depending on the CMS you are using. Play around or get a developer.
The above setup has got me some mesmerizing results so far.
Here is another example of one my keyword rankings in the top four positions. (It keeps changing every day.)

My targeted keyword, in this case, is pbn hosting, and as you can see, it’s ranking in the top four positions. I barely have any links to these.
Don’t believe me?

The link barely has six referring domains.
However, it has a fantastic On-Page SEO (everything that I have written in this guide along with the quality of the content has helped me to rank and gain hundreds of customers in such a short period.)
Also, it’s easy to remember short URLs. Which means, often, once your site or blog becomes popular, it’s a lot easier for people to share.
#7) Start Your Blog Post with a < h1 > Tag
The first time Google crawlers visit your website, they start reading the content.
An < h1 > tag is the most important tag and holds a lot of emphasis.
It’s often advisable to begin your blog with an H1 tag.
In my case, it looks something like this:

As soon as someone lands on my website, the first thing they see is the title of the blog posts.
Also, whenever a search engine crawler visits, they the same as in the H1 tag.
Most of the modern themes are built around on the same principle that the blog post title automatically becomes an h1 tag regardless of the CMS.
However, it’s better to do your due diligence to avoid this crucial mistake.
Here is my advice: Make sure to keep your Meta Title and H1 tag the same. Also, do not have more than one H1 tag on a single page.
#8) Have your Keyword in < h2 > Tag
Got the H1 tag covered?
It’s time to add an H2 tag to your website.
It’s important to wrap your H2 tag at least once inside the H2 tag per page for your targeted keyword.
Here is an example:

Should you wrap primary keywords multiple times in the H2 tag?
In an ideal scenario, I will not recommend that unless it’s necessary.
One of the questions I often see people asking is whether it’s ok to have multiple H2 or H3s?
Yes, it’s completely fine.
Most blog posts have outlined their blog articles and wrapping them around the H2, and H3 tags are completely fine.
Here is my advice: Apart from your primary keywords, try adding multiple LSI keywords in your H2 and H3 tags.
#9) Have your Keyword in < h3 > Tag
Once you are done wrapping up your keywords in the H1 and H2 tag…
…try adding a few sub headings as H3 tags inside your H2 tag with your targeted keyword at least once.
I have seen a massive impact with this. However, even the slightest of changes matter a lot.

In the above example where my primary keyword is micro niche sites, I have added them once in my H3 tag.
Want to see the result?

Without even building any backlinks, the site is currently ranking on the second page and doing brilliantly well. (I am planning to build some links soon and push for the #1 spot.)
Subscribe to my blog to stay updated, and once I push my article from page two to page one, I will share my technique.
#10) Internal Linking SEO Strategy
Want to know why I rank so much better?
It’s because of the Internal Linking SEO strategy.
I use this strategy all the time because it’s extremely powerful.
Let’s understand the power of interlinking and how it works.
Let me explain how interlinking works:

One page of your site is interlinked to the most relevant of another page.
Internal Linking SEO Strategy passes a lot of link juice throughout your website making each page of your website extremely strong for better ranking!
Here is my advice: Link around 3-4 of the most important and RELEVANT articles with your primary and LSI keywords. Do not try to link beyond more than four links because you can potentially dilute the link juice.
#11) Outbound Links to Related Websites
Want to make it easier for Google to understand your content better?
Start linking to relevant sites with relevant content.
Here is how it works:

As you can see in the image above, creating relevant outbound links is not at all difficult.
All you have to do is link a piece of your content to one of the related articles.
It can be a case study on some other site or a piece of information that provides a better in-depth knowledge on the same or similar subject.
How does this work?
Whenever Google crawls your website, they try to understand all pieces of your content. However, the bots need more information to understand you are writing on the same subject.
To make your content Google bot friendly, start linking out to relevant site in the industry, making the bot’s life easier.
This strategy alone can give you a major push with better SERP ranking. Anywhere from 2-8 links per article (depending on the word-count) is great.
Here is my advice: While you link out to another relevant site, it helps you with:
- Giving you an opportunity to build a relationship with the other site. (Tweet or email the site whom you have linked to saying they have been featured on the blog.)
- Makes it easier for bots to understand your content.
#12) Optimizing Images for On-Page SEO
One for the other important optimization technique that people miss out?
Let’s dive in right away!
Look:
We all love websites and blog posts that have a lot of images and videos because an image speaks a thousand words while a video speaks a million.
However, there are some extremely important optimization tips regarding images.
Add a ton of images (& relevant videos) to the website, making it media rich.
If you have read my other blog posts (which you should if you haven’t), you will notice that I use images very heavily for every article that I write.
Primarily, I will use anywhere from one to ten images per outline depending on the subject I am talking about.
Here are some pro tips:
- Don’t use a stock photo.
- Don’t use images from other people’s website.
- Use screenshots. (I rely on screenshots very heavily.)
- Make small custom graphics with the help of photoshop. (If you are not a designer, then you can easily outsource them for few dollars on Upwork or Fiverr depending on your budget.)
- Make large infographics and crop them for each outline.
Once you have your custom graphics, here are the three most important points that you cannot miss out.
Save your images with relevant LSI Keywords.
Here:

If you look at the image above, you will notice that I have saved one of the images that I created, using Photoshop, like “outbound-links.jpg”
This is crucial and will help search engines understand your images better.
Also, the chance of your images ranking at that stage is a lot higher.
Optimizing those images to reduce the size of the image.
Look:
Images can get heavy and bulky!
Which means they can slow down your website.
However, there are ways where you can save these images for web purposes.
In easier terms, you can compress the original size of the images by 50-80% without losing any quality.
I will demonstrate two ways you can achieve the same results as mine.
1) Use Photoshop’s Save for The Web.
Photoshop has an amazing, built-in compression engine—one of the best available in the world to date.
You can use the following settings to compress the images:

- Select JPEG as your preferred extension.
- Keep the quality around 60.
- Lower down the percentage of the picture to 80% if required.
- Keep a check on the file size. (Shouldn’t exceed 100 KB at any point unless it’s a heavy infographic.)
For other types of images, try not exceed the 150-200kb range.
2) Use Free Online Image Compression Tools.
Don’t have Photoshop?
I have got you covered.
One of my favorite sites that I use all the time other than Photoshop is compressor.io.

The compressor.io works great. Just drag and drop your image and then hit the download button to get the compressed files.
Use Alt Tags.
Alt tags are as important as naming your images with your preferred keyword.
When crawlers see your images, the first thing they read is your alt tags to understand your image better.
It’s essential you add alt tags to every single image of yours.

In the above example, look at the name of the image, and the alt tag is the name, making it easier for the crawlers to understand.
My Quick Advice: Use LSI Keywords as your ALT tag throughout your images because it will help your article rank better.
#13) LSI Keyword Optimization
LSI…
It stands for Latent Semantic Indexing.
LSI is a method to determine the correlation between the terms and the content you are drafting.
(I will be covering a separate in-depth topic on LSI). Make sure to subscribe and be the first one to get notified.
One of the best SEO hacks to quickly get better rankings is sprinkling your articles with multiple LSI Keywords and forming meaningful sentences around the LSI keywords.
Here is an example:
This article is all about On-Page SEO, and my targeted keyword is the same.
Here is my secret little trick…

Head over to Google and type your primary keyword and add _ as shown in the GIF above.
You will see a bunch of suggestions by Google.
Scroll down to the bottom, and you will further notice a bunch of Google Suggested Keywords.
Grab them all and put them in an excel sheet.
Now:
While writing your article, use the LSIs and form sentences around them.
I recommend using up to 5 LSI keywords for every 1,000 words.
In my scenario, if you scan through my entire contents, you will notice that I am using all of the suggested keywords by Google.
I have wrapped up significant sentences around the Google suggested keywords.
#14) Use of LSI Keyword in an < h3 > Tag
Another swift little method I use to gain some good traffic is using this small SEO hack:
I often use some of the Google suggested LSI keywords and wrap them as an < h3 > tag along with expanding the sub heading.
On many of my micro niche sites, I often use long-tail LSI keywords in my H3 tags, giving me a quick, nifty boost to my rankings and instantly helping me rank for them a lot faster.
In this article:
I am using several H3 tags with my relevant keyword inside the H3 Tag
Here is one such example:

Here is my advice: Do not add more than one keyword per 1,000 words.
#15) Use Schema Tags Throughout Your Website
Schema tags are extremely powerful.
Why may you ask?
Because Google loves it when you structure your website correctly because it helps them to understand your content better.
As a reward, you will get a much better CTR, which will help you to move up in the rankings.
Schema Tags are one of the most powerful On-Page SEO ranking factors in 2017 that even some of the top SEO gurus and well-known people in the industry are not using.
Here is a great example:

If you google the term “Udit Goenka” from your phone, which is my name 😄, you will notice that my image shows up.
The image is not showing up magically.
It’s because of the Schema Tags.
Here is a list of all the relevant Schema Tags you should start using for your website right now:
1) Schema Sitenavigation
This Schema Tag helps Google to understand the menu structure of your website.
Ensure that you use the same for your footer menu as well.
To implement, read this:
https://www.schema.org/SiteNavigationElement
2) Schema Tag Type
This Schema Tag will help Google understand what kind of site are you running.
To implement, read this:
http://schema.org/Organization
3) Schema Tag LegalName
This Schema Tag helps Google understand the brand, or legal, name of your website.
To implement, read this:
https://schema.org/legalName
4) Schema Tag URL
This Schema Tag helps Google understand the URL of your website.
To implement, read this:
https://schema.org/url
5) Schema Tag Logo
This Schema Tag helps Google find your logo on your website.
To implement, read this:
https://schema.org/logo
Some of the other popular tags you can use are the following:
Schema Tag Review:
One of the most popular Schema Tags used by millions of blogs is the Review Tag.
Here is how it looks like when implemented:

To implement, read this:
http:// schema .org/Review
Depending on your site type, you can implement the respected Schema Tag that fits your purpose best.
#16) Use of HTTPS Connection
In 2014, Google officially announced HTTPS as a ranking factor.
However, a lot of people were still skeptical about it as SSLs remained expensive (especially if you own dozens of websites).
Due to the launch of an open source program, Let’s Encrypt, the implementation of SSL has occurred at a rapid pace.
Early 2017, https became an extremely important factor.
With the rise of https, on an average for any given keyword, you will witness 70% of the sites have SSL enabled for a majority of the keywords.

In the above example, the keyword “Best WordPress Plugin” displays results that have 80% sites hosted securely.
If you still haven’t added an SSL yet, contact your hosting provider right now!
Here is my advice: If you are a non-technical person, sign up for CloudFlare’s free service. They offer simple, one-click SSL enabling options.
#17) Use of Social Sharing Icons
In 2017, social sharing is not the On-Page SEO Performance.
However, it does helps you to grab more eyeballs and traffic, increasing your presence socially.
If not a significant role, social sharing does play a minor one towards ranking factors specially for long-tail keywords with very little to no competition.
Also, you can potentially get some link building opportunities.
You can use any of the popular social sharing platforms like Sumo, AddtoAny, or AddThis with just a few a clicks, for no cost.
#Bonus: Subscribe to Receive the Bonus
Looking for my final bonus tip? Subscribe to my newsletter and you will receive an email instantly.
#Test Your Blog Post Against Adwords
One of the most elite tricks that are underused by most people is using Adwords to determine how fantastic is your article.
Confused?
Let me explain:
When using Adwords, if your landing page is very well optimized for your keyword, it will show you a relevant score.
The higher the score, the cheaper the cost-per-click for your ads will be.
However, not many people know that they can spend around $25-30 on an Adwords campaign to check their primary keyword for about a week to determine the score of their page.
If the score is too little, you can spend time optimizing your landing page further.
However, if your score is close to 9/10 or 10/10, then congrats! You have mastered the art of On-Page SEO using my Re-Optimizing Guide.
#Check Your Text Readability Score
Another neat way to test your article, and the potential performance of your article, is using Hemingway Editor.
It has an amazing option that shows the readability score of your article providing you with a lot of good suggestions.
Once you have completed your draft, you can move your article to the editor for the first round of post edits.

Your language and grammar play a significant role towards better ranking. More details are covered in my bonus ranking factors. Make sure to subscribe to my newsletter to receive the bonus.
#Tools to Automate On-Page SEO Check
There are no tools available to 100% automate your On-Page SEO checks.
However, there are a few tools available on the market that can provide a good amount of checks.
One of my favorite ones to handle some part of the On-Page Automation is SEMrush. It does a great job at handling the basic Audits for your On-Page.

Other than that, I recommend you do the On-Page SEO audit manually to avoid any possible problems.
#Download My On-Page SEO Checklist
To make your life easier, I have combined my entire list into a beautiful On-Page SEO Checklist that you can use on an everyday basis.
Also, I have added two bonus checklists that are only available in the PDF.
Want to grab a copy of the PDF?
Hit the download button below! (Make sure to check your SPAM folder since the PDF will be sent as an attachment.)
#Conclusion
Just to Quickly Summarize:
On-Page SEO is one of the most crucial aspects of your SEO campaign. A highly optimized page on your site can help you reduce your off-page SEO work by 30%.
That means you need to build fewer numbers of links to perform amazingly well on the search engine.
I use the guide I just wrote on an everyday basis for every single one of my clients. At the same time, my team is trained to ensure all of the above points for all my clients.
These On-Page SEO suggestions work amazingly well as of now, in 2017, and I will ensure this page is updated as your go-to On-Page SEO resource guide until SEO ceases to exist. 😅
I hope you enjoyed the article.
If you did, leave your thoughts in the comments below.
Also, I will love it if you share the article on your preferred social media platform. 🙂
总结:
这篇内容以对话式和充满激情的口吻撰写,强调了页面SEO在获得高搜索排名中的关键作用。文章提供了一个详细的17点清单,用于优化网站内容和结构。
作者首先用一个比喻来引入话题,将博文比作一道菜谱,而页面SEO就是让这道菜变得美味可口的“调料”。清单的要点包括:
- 提升网站速度: 加载速度更快的网站是重要的排名因素。作者分享了一个案例研究,说明切换到用React和Ghost CMS构建的自定义设计如何显著增加了一个网站的流量和排名。
- 内容长度: 深入、长篇的内容(约1900字或更长)通常排名更好。关键在于提供高质量、全面的信息,而不仅仅是堆砌关键词。
- 移动设备响应性: 由于谷歌在2015年推出了“移动设备友好”更新,拥有一个对移动设备友好的网站至关重要。
- 关键词放置: 将主要关键词放在元标题(meta title)的开头,并将其包含在元描述(meta description)中。
- URL结构: 使用简短、以关键词为中心的URL(最好少于五个单词),并避免在URL中使用日期。
- 标题标签(H1、H2、H3): 使用H1标签作为文章主标题,并在H2和H3标签中包含关键词和LSI(潜在语义索引)关键词,以帮助爬虫理解内容层次结构。
- 内部和外部链接: 链接到自己网站上的其他相关页面(内部链接),以传递“链接权重”;同时链接到高质量、相关的外部网站(外部链接),以提高内容对搜索引擎的可信度。
- 图片优化: 在图片文件名和alt标签中使用相关的关键词。压缩图片以减小文件大小,在不损失质量的情况下提高页面速度。
- LSI关键词优化: 在内容中使用LSI关键词,向谷歌展示主题的相关性。
- 结构化数据(Schema Markup): 使用Schema标签(如网站导航、组织、评论等),提供结构化数据,帮助谷歌理解你的网站,并可能提高点击率。
- HTTPS: 使用SSL证书保护你的网站,因为HTTPS是一个已确认的排名因素。
- 社交分享: 虽然不是主要的排名因素,但社交分享可以增加曝光、流量,并带来反向链接的机会。
文章最后提供了一些额外的“彩蛋”技巧,包括使用Google Ads来测试着陆页质量,使用像Hemingway Editor这样的工具来检查内容的可读性得分,以及利用SEMrush进行基本的页面SEO审核。作者提供了一个可供下载的清单作为吸引读者的工具,并强调强大的页面SEO策略可以显著减少对外部SEO工作的需求。